libtrace – a library function tracer for FS-UAE

During development traces are a really helpful source of information when doing debugging or if you simply want to understand how a system works. When developing for the classic Amiga platform you learn a lot about the inner workings of applications if you could see what library functions they call and what parameters they pass in and get out. You can observe its behavior without having the source code and all that almost live…

Here libtrace comes into play: Its a debugging extension I have written for the famous FS-UAE Amiga emulator that allows you to take this look behind the scenes of the system: You can trace any library and any function set and you will see what function was called by printing its name, the arguments and the values passed in an out…

Continue reading

romdisk 0.1 released

Recently, I was thinking about a minimal Amiga emulation setup that is required to run Exec and Dos from a Kickstart ROM image. Think of a reference platform for vamos. I soon came to the conclusion that all kinds of boot types result in accessing a device that provides the requested file system blocks. As a consequence the emulation also needs to emulate some kind of device accesses next to the essential CPU, memory, and CIA (timer, serial) emulation we will need at least. Trackdisk device needs custom chip support for track reading, while scsi.device needs some IDE host emulation.

If you compare a classic Amiga with modern embedded devices (like a Raspi or a Beagleboard) you see a difference: the modern devices often allow to boot directly their filesystem of the on-board flash. “Why not create a ROM bootable device for Amigas?” was the next question that came to my mind. With such a device it is sufficient to emulate CPU and memory and the Amiga can already boot…

The result of this initial idea is a small project called romdisk: It offers a romdisk.device that can auto-boot a modern classic Amiga (OS 2.x or 3.x) and also a tool to embed disk images into an ext. ROM image. Without compression you get ultra fast data access, but with compression you can even fit a complete Workbench floppy disk image (880 KiB) into your 512 KiB ext. ROM.

The first public release is now available and can be found on my new romdisk project page!

While it started as a helper project for my emulation tests, I am sure you can think of new uses for romdisks, too. E.g. some diagnosis tools that do not need external devices to run, or a rom disk stub that loads non-rommable modules and then heads over to full boot from hard disk, or a small network boot disk that loads the main file system via network…

Have Fun!

pifon 2.0 released

Due to recent events (I became a dad a second time 🙂 I revisited my audio baby monitor project for Raspberry Pis called Pifon. The former setup of having one Pi observing one room is not enough anymore and therefore the new version adds multi-room support!

mon observing 2 fon clients

mon observing 2 fon clients now

Now you can add as many fon clients as you like. Well, at least up to 3 will be shown in the new UI on the LCD 🙂 All others are still handled but not shown.

While hacking the source I almost completely rewrote the XMPP based bots for mon and fon parts and added some nice features along the way: Configuration is a lot easier now and audio streaming was optimized.

Now a direct SSH pipe is created to connect the microphone device on the fon unit with the player on the mon unit. In favor of this new approach the old way of using a streaming server was dropped. (If you still need it then the new config freedom allows you to simple add the necessary commands again.)

Finally, the UI on the 16×2 LCD was greatly improved and can now show scrolling text if something interesting happens and furthermore draws nice bar graphs showing the incoming audio levels:

Pifon mon running in simulator. Showing some activity bars

Pifon mon running in simulator. Showing some activity bars

The screenshot shows the new LCD simulator that allows you to run the mon client also on a system without real HW LCD connected (but you then need PyGame for display)…

Now head over to the new pifon Project Page and start building your own now!

Amiga Parallel Port: How fast can you go?

In my plipbox project a fairly fast AVR 8-bit MCU with 16 MHz was connected to the Amiga’s parallel port to transfer incoming and outgoing IP packets from/to the attached Ethernet controller. A protocol on the parallel port was devised to quickly transmit the bytes in both directions. In version 0.6 a data rate of up to 240 KB/s was achieved… The question now arises if this is the top speed we can get or is the parallel port capable of more?

This blog post shows the results of my experiments I performed with the parallel port on my Amiga. It tries to show different classes of transfers possible on this port and gives the achievable maximum speed of each class.

Since the available documents and data sheets are all lacking the exact description of the I/O part on the peripheral side of the device, this blog post is also an effort to try to document this undocumented side of the parallel port (or: “What you always wanted to know about your CIA 8520 and never dared to ask”)

Continue reading

A lua shell for FS-UAE

While FS-UAE recently added a scripting interface with a Lua scripting binding, it only provides capabilities to write scripts with hooks that will be called on certain emulator events. I  hacked this scripting interface and added a Lua remote shell. With this shell you can connect while the emulator is running and issue commands. I also started to add disk image related functions to the Lua binding. With these features combined I could show off the power of a scripting shell by writing a tool to insert floppy and cd-rom disk images while the emulator is running – a long awaited and missing feature… Continue reading

fbTFT Setup on modern Raspbian

I am a big fan of those small TFT displays in the size of the Raspi. They even come with a resistive touch panel and allow you to realize small applications with full UI control. With the fine fbtft drivers from notro you can access them as regular framebuffers and use all software that runs otherwise only on “big screens” via HDMI.

While setting up the TFT support in a Raspbian system was quite complex and includes compiling an own patched kernel, nowadays things got really simple. In this post I’ll give you a overview on the setup and how easy it has become…

(And it works for good ol’ Model A/B, A+/B+, and shiny new Model B2!)

Continue reading

plipbox 0.6 released

It took quite a while to finish the release (over a year :)) but I think it was worth the wait:

  • A new parallel burst transfer mode was added that really improves the I/O speed on this Amiga port. You will get up to 235 KiB/s across the lines!
  • Added new test modes for performance measurement on Ethernet Port, parallel port and on Amiga side (device loop back, SANA-II API loop back, and TCP/IP stack look back via UDP round trips)
  • Cleaned up firmware and driver code and rewrote firmware to handle full Ethernet frame in SRAM (2 KiB that is for both firmware and 1518 Bytes packet)

Get your copy of plipbox 0.6 on the plibbox homepage!

Here are some performance numbers:

  • Amiga 500 + ACA500:
    • Parallel Transfer: 175.39 rx/201.11 tx KB/s
    • Ethernet Transfer: 314.27 KB/s
    • Bridge (Internal Device Loopback): 102.65 KB/s
    • Bridge (SANA-II API Loopback): 92.88 KB/s
    • Bridge (TCP/IP stack Loopback): 71.81 KB/s
  • Amiga 500 + ACA500 + ACA1230/33
    • Parallel Transfer: 234.36 rx/234.80 tx KB/s
    • Ethernet Transfer: 314.05 KB/s
    • Bridge (Internal Device Loopback): 127.27 KB/s
    • Bridge (SANA-II API Loopback): 123.68 KB/s
    • Bridge (TCP/IP stack Loopback): 114.38 KB/s

plipbox 0.5 released

Release 0.5 of plipbox is now available and contains a software-only update that ships both a new Amiga plipbox.device driver and a new AVR firmware.

New features are:

  • Most important change is the handling of the MAC address. While in previous versions you had to set the correct MAC in both the Amiga driver and the AVR firmware, the new version automatically transmits the MAC address from the driver to the firmware. Inside the driver you can alter the address with SANA-II commands (if your TCP/IP stack supports it). This allows you to set different MACs that are required if multiple plipboxes are running on the same network.
  • I also added some features of the Ethernet chip to be enabled by firmware parameters: Namely full duplex mode and flow control are new options you can play with to tune the performance.
  • The new firmware also tracks the online/offline state of the driver and enables or disables the Ethernet module accordingly.
  • On the firmware’s command console I improved the device statistics output by adding the number of filtered, dropped or erroneous packets. Furthermore a new error log shows you if errors were found on the parallel transfer.
  • Under the hood quite a lot changed: I re-wrote the whole parallel protocol to use a client (Amiga device) server (AVR firmware) model. That better fits our application as the old MagPLIP way assumed a peer to peer protocol on the parallel line. This driver driven approach simplifies the protocol significantly and obsoletes collision handling…

Now grab your copy of the new release on the plipbox page and have fun!!

Networking on the Minimig with PPP and Roadshow

When working with an Amiga running on a Minimig platform then data transfer is not as convenient as one might think: You have an SD Card connected and copying files around with SD Card is not the biggest deal, but unfortunately your Amiga is currently running from a system drive stored on this card :/ Each copy operation therefore essentially requires a reboot of your Amiga and that’s not the productive work flow I had in mind…

That’s the reason why I always prefer having network access on all my machines for truly covenient file handling (e.g. with FTP, wget…).

In my last post I showed you how to add a SilverSurfer high speed serial port to your Minimig running on the Turbo Chameleon 64. Now we will use this serial port that is running up to 115200 Baud with ease for something useful: networking! Old farts remember the times when home network access was done with PPP and a serial modem gateway. We’ll go that road but replace the modem and gateway with a small and cheap Linux machine, here the all hyped Rpi and a direct serial “null modem” link via an USB-to-serial adapter.

TC64 with SilverSurfer attached to Raspi

TC64 with SilverSurfer attached to Raspi

Read on to find out all the glory details, starting with a pure “virtual” simulation running on a Mac on to the real thing…

[You can use this approach to bring other classic Amigas to the network, too. But for all machines with a parallel port available I’d suggest to use my plipbox project: Its far easier to setup, a lot faster (4-5x ), and even cheaper :)]

Continue reading

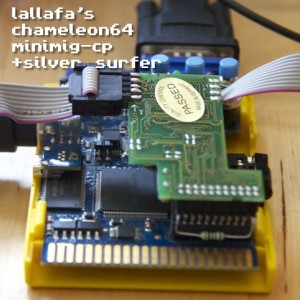
A clockport for Chameleon64’s Minimig

The Chameleon64 is a very powerful and versatile cartridge: Although its initially a C64 cartridge, it also runs standalone and allows to emulate different machines by replacing the FPGA programming. Today I use mine mainly as a HW Amiga emulator with the brilliant Minimig FPGA implementation.

If you look at the HW of the Chameleon you’ll see the clockport connector on the lower right. While this connection was initially devised for the Amigas to add a Real Time Clock (hence the name), it soon became a versatile 8 Bit interface for lots of different HW extensions. It was even “ported” back to the C64 to use some of the Amiga extension cards there as well… That’s the reason why you find it on your Chameleon…

Hmm, I thought… now with an Amiga running on the cartridge why not close the circle and make the clockport accessible to the Minimig, too?

A new project was born: TC64 Minimig-cp (cp for clockport!):

tc-cpRead on if you want to know how this was done and if you want to try it out yourself, e.g. use your SilverSurfer serial card on your Minimig Amiga 🙂

Continue reading